Project update 2 of 15
Software Architecture of the HealthyPi v3
This update describes the software architecture of the HealthyPi to allow for easy modification and customization, and how you can integrate with your application. Our Github repository for the HealthyPi-v3 is now public at https://github.com/Protocentral/protocentral-healthypi-v3, we will keep updating this code as the project progresses.
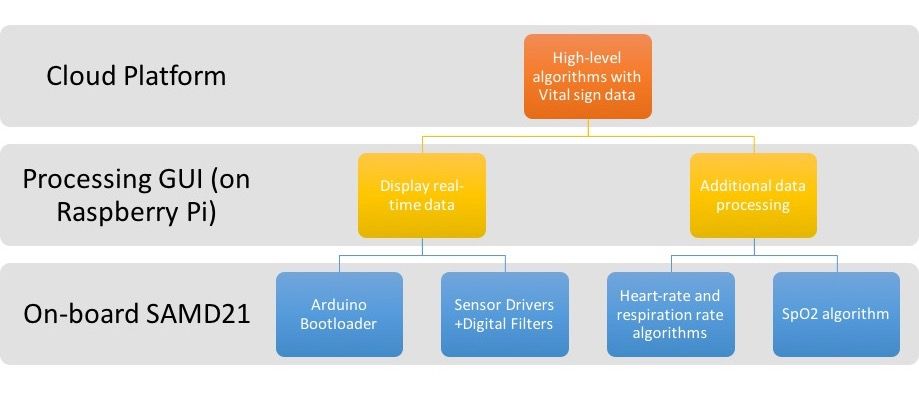
The software for the HealthyPi is present in different components of the system and is designed to provide easy access to several levels of the code.
The objectives of adopting this software architecture:
Easy to modify: It should be easy for the user to modify any layer in the stack (by stack we mean the processing done at each level).
Abstraction of functions: You only need get involved with the software as much as you want to, at any level.
Standalone Functionality: The HealthyPi should usable even without a display or even without a Raspberry Pi.
Integrating the HealthyPi with your application
Most people that would buy the HealthyPi would do so to run their code on top of this platform. The HealthyPi provides the vital sign data required and the analytics software can just consume this data for decision making or even predictive analysis. Integration can be done at either the firmware level or the GUI-level.
HealthyPi v3 board firmware:####
We have written the firmware in Arduino for one primary purpose; ease of modification. The functions of the firmware running on the HealthyPi’s Arduino-compatible ATSAMD21 microcontroller are:
- Read data from ADCs/Sensors: The HealthyPi uses the Texas Instruments ADS1292R for ECG and Respiration measurement and the Texas Instruments AFE4490 for optical PPG measurement. Both of these devices are connected through SPI. Body temperature is measured using Maxim's new MAX30205 body temperature sensor, that is connected over I2C.
- Data Processing: This includes the initial filtering of the data (especially filtering of 50/60 Hz line noise), heart-rate calculation from the ECG using a QRS detection algorithm and SpO2 calculation from the PPG signal.
- External Interfacing: The HealthyPi sends data simultaneously over the UART (that is connected to the Raspberry Pi's 40-pin HAT header) as well as through a USB-CDC interface (for standalone operation).
HealthyPi v3 Processing GUI:
Again, the Processing environment is used for the sake of simplicity and accessibility. The code is written in basic Java. The functions of this layer:
- Read Data from a Serial Port: The processing GUI's main tole is to read the data stream coming from the HealthyPi's UART interface. The GUI also has the option of logging the data to a file.
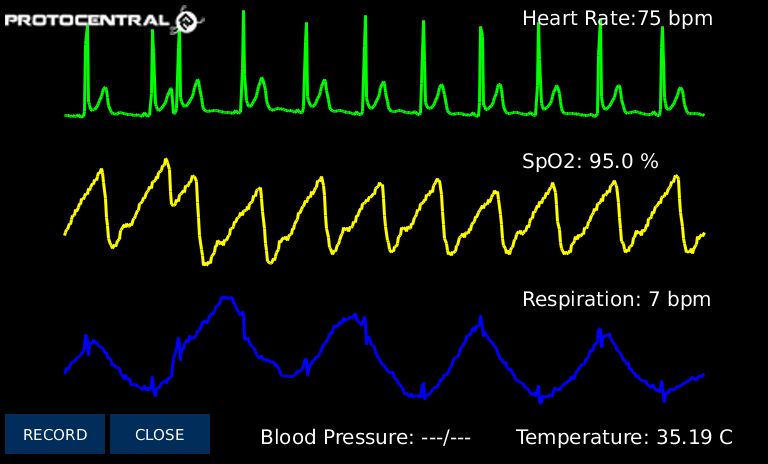
- Visualize the data: The GUI is designed to look and feel as close as possible like a standard patient monitor's UI.
- Computation: You have the option of moving some of the algorithm code to the GUI. Since it runs on a Raspberry Pi; or in standalone mode on a Windows/Mac/Linux PC, you can do more computation intensive processing here. An example would be to find out heart-rate variability using the heart-rate tachogram.
- Internet Connectivity: Acts as a gateway to the internet of things. The Raspberry Pi 3's built-in Wi-Fi makes it the perfect solution to connect to a cloud platform. An MQTT library is integrated into the software at this layer to provide a standard "Publish/Subscribe" to the data.


