Project update 12 of 15
The Final Enclosure is Here!
by Ashwin WhitchurchWelcome to this month’s update on the HealthyPi Move’s production.
After more than a year of design iterations and testing, we are happy to announce the final enclosure design for HealthyPi Move is here, and our first production run of the new enclosure is complete. This signifies a major milestone in the project, so we are very excited to share the details with you.
It’s Here and It’s Clear!
After much debate about the color and feel we wanted, we were at risk of getting dragged into the "paralysis by analysis" trap. We finally made the decision to keep the enclosure all clear. This gives the device a very modern, clean look and also allows the user to see the internal components (and maybe even print their own internal components in whatever color they want). We’re proud to say the final design is a very clean, minimalistic design we made from scratch; it’s not some off-the-shelf design that we just slapped our logo onto. We will publish the design files for the enclosure on our GitHub repository after we have shipped all the devices to our backers.
While it is a very simple design, it took a lot of effort to get it right. Here are some pictures that speak better than words (and some words describing the design and our thought process behind it). This is a long one, so grab some popcorn and read on, or just scroll through the pictures.
The main body is made of (near) crystal clear Vacuum Casted polycarbonate. This makes up the main top hollow body for the display and everything else that stacks below it, the arms which hold the two pieces of the strap on either side, and the side cutouts for the button and USB-C port. Polycarbonate is one of the stronger and more durable thermoplastic polymers with high impact resistance which is also very clear. We had to go through a few iterations of the mold to get the clarity right and to get the thickness correct.
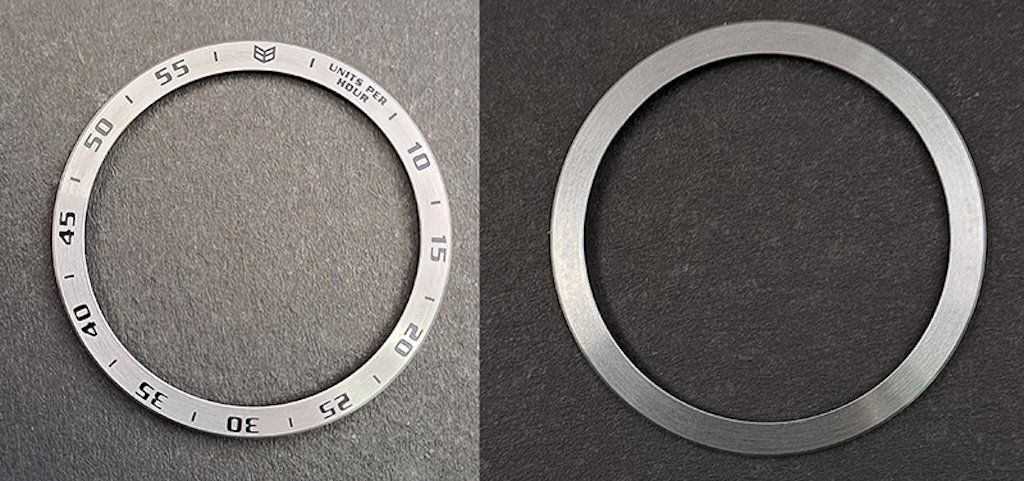
The top bezel is made of stainless steel with a brushed finish. This bezel acts as one of the ECG electrodes while also serving to protect the display from chipping. Although it doesn’t seem like a big deal, the bezel was a bit of a challenge to get manufactured, since all the manufacturers we contacted made it clear that unless we were ordering a few thousand pieces, they wouldn’t be able to make it for a reasonable cost. While looking around for options, we finally found a specialised watch manufacturer who makes after-market bezels like these for smart-watches. Although they were available off-the-shelf in smaller quantities, these were in standard sizes and had different types of (mostly meaningless) printing on them. So we did what any maker would do, bought them in bulk and removed the printing with paint thinner and got a clean finish while also getting great ECG quality when fingers are placed on them. While we cannot get custom-sizes of these bezels, we changed the problem instead and adjusted the dimensions of the top of our enclosure slightly to fit a standard bezel designed for another popular smart-watch.
Now we needed a way to attach the bezel to the enclosure. After some experimentation, we came upon a solution to hold it in place on the top surface using 3M VHB tape. We had to find someone to precision cut this tape to the exact shape of the bezel, while leaving a break in the tape for the ECG electrode connection (from the spring-loaded connectors on the top PCB). We found a 3M dealer who also does custom cutting and convinced them to make this for us. This grade of 3M VHB tape is very strong and we discovered that it is even used in the automotive industry to attach side panels to vehicles. If it’s good enough for the outside of a car operating in a harsh outdoor environment, it’s certainly good enough for this application!
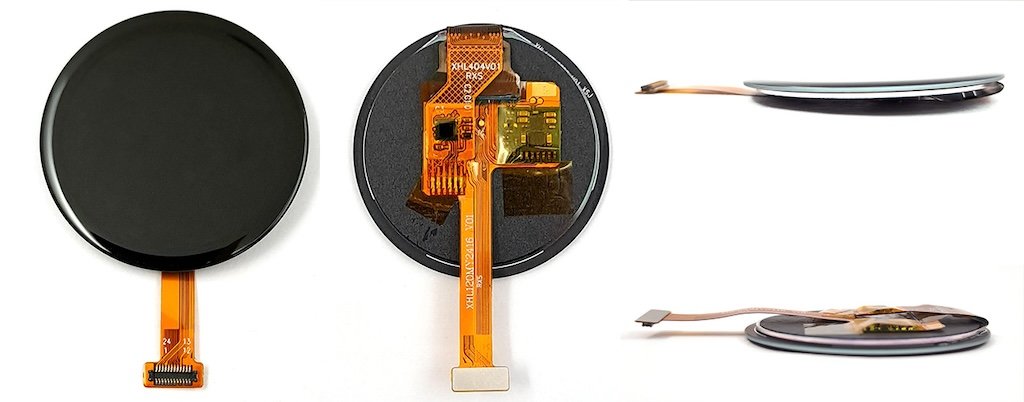
The display as shown in the photo is a 1.2" AMOLED display with a resolution of 390x390 pixels. This is a full color display which is very bright and clear. As evident from the photo, the display was clearly designed to be flush mounted with the top surface with only the display sticking out. In our design however, we needed to recess the display a bit to make place for the bezel to sit flush with the top surface. We acheived this by designing a custom, 3D-printed "display holder" to hold the display in place, while keeping in mind the design goal of making the device easy to open and repair and no glue.
The next problem (which didn’t seem like a problem at first) was how to attach the dislay to the display holder. We just assumed it could be glued onto the holder with some acrylic glue (as we learned from tearing down some consumer electronics). This seemed to work until we noticed that the displays were failing once the acryclic get enough time to flow into the backing foam and hardens (since this is an AMOLED and not a LCD, there is no backlight or reflector, but just some foam). Also, the touch screen on these displays is what is known as "On-Cell Touch" which means the touch sensor is essentially on the display itself and not on a separate layer, so the acrylic glue was indirectly also affecting the touch sensitivity.
Back to the drawing board on this one, we started asking display manufacturers and other people who have used these displays before. The solution was unanimous and simple: use a 3M double sided VHB tape that is specifically designed for displays, duh! This specific tape is very thin (0.3 mm), has very high bond strength, and is designed to bond glass to plastic or metal. This tape is used in the mobile phone industry in new devices to bond the display to the phone body. In fact, 3M has a whole range of tapes for this purpose. So we went back to our 3M dealer who cut the bezel tape for us and asked if they have this tape and if they can cut this to the exact shape of the display. After a bit of back and forth shipping of samples, we finally got the right combination of the tape, so the displays are now being assembled with this. The result was a very strong bond and the displays are now not failing anymore, nor is the functionality of the touch screen affected.
The rest of the assembly was something we had designed earlier (our so-called "inter-structure" assembly), which looks a bit like a UFO on legs. This is a single-piece object made of 3D-printed ABS which holds all the components together from the top display assembly to the main PCB, the battery, and the sensor board (in that order). This gives strength and rigidity to the entire assembly and also makes it easy to assemble and disassemble.
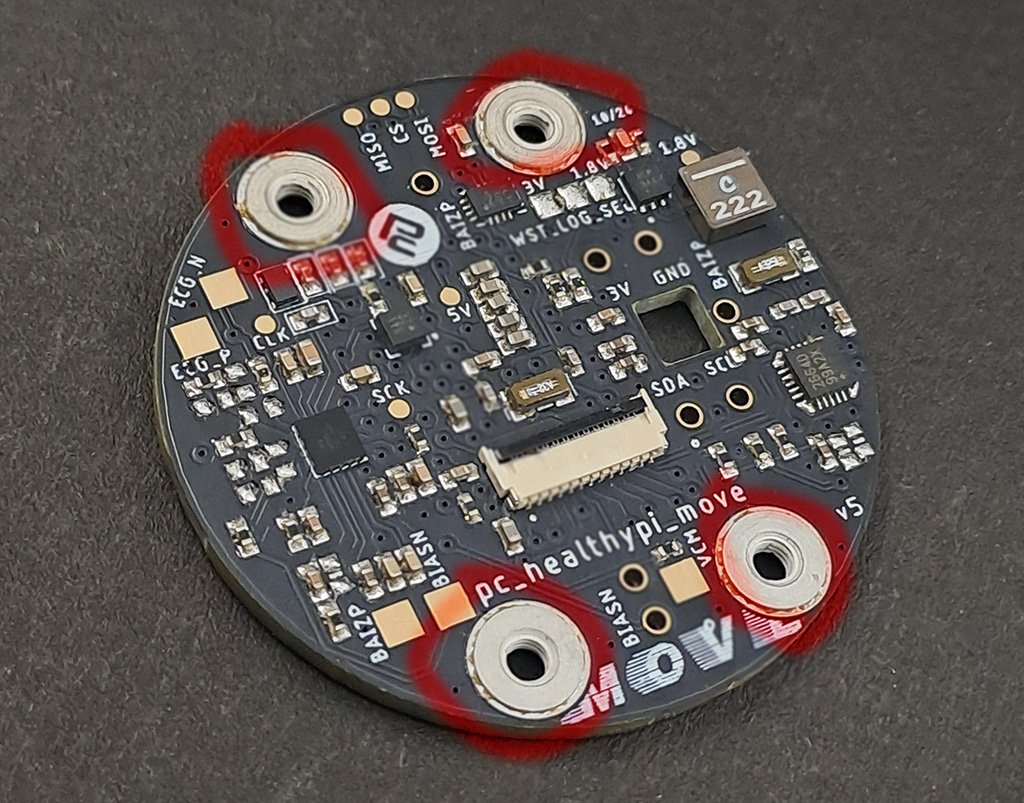
The final assembly is shown below. Fours screws hold the entire thing together, but the challenge here was that we didn’t want to use a nut on the other side of the screw, which would be on the bottom of the assembly and would increase the thickness. After some research on Mouser, we found these "zero-height" threaded inserts designed to fit in a standard PCB plated through-hole and which can be assembled by the standard PCB reflow process. This was our saving grace and we were able to use this spacer to hold the entire assembly together.
Now, coming to the bottom of the enclosure, we needed to give provision for the optical frontend to be exposed directly to the skin and the ECG electrodes and the GSR electrodes to be in contact with the skin. After much debate, we decided to go with a simple solution of putting all the four electrodes on a single 1.6 mm thick PCB with four gold-plated pads for the electodes (two for the ECG, vertically aligned and two more for the GSR, horizontally aligned) and a cutout in the middle for the optical sensor. This PCB is directly soldered onto the sensor PCB for maximum strength. This PCB comes out of the bottom cover of the enclosure by about 0.6 mm, which acts as a "Mesa" structure to keep the electrodes in contact with the skin and also maintaining a good optical seal for the optical sensor.
The final assembly is shown below. The entire assembly is held together by four screws and the entire assembly can be taken apart by just removing these four screws. The battery is held in place by a custom, 3D-printed battery holder that is also part of the inter-structure assembly. This PCB + display + electrode assembly just "slides" into the main body and is self-aligned by some positioning grooves we designed into the interior surface of the main body.
Finally, an important part of any watch is the strap. The arms on the device body has provisions for attaching a 22mm standard strap. We decided to go with a simple two-piece strap design made of a soft TPU material. The strap is held in place by a simple spring bar mechanism that is standard in most watches (no fancy button press mechanisms here like Apple or Samsung). The strap is also designed to be easily replaceable and can be swapped out with any standard 22mm strap. The one that will ship with your device will be a creamish-white strap that is sometimes referred to as "Starlight".
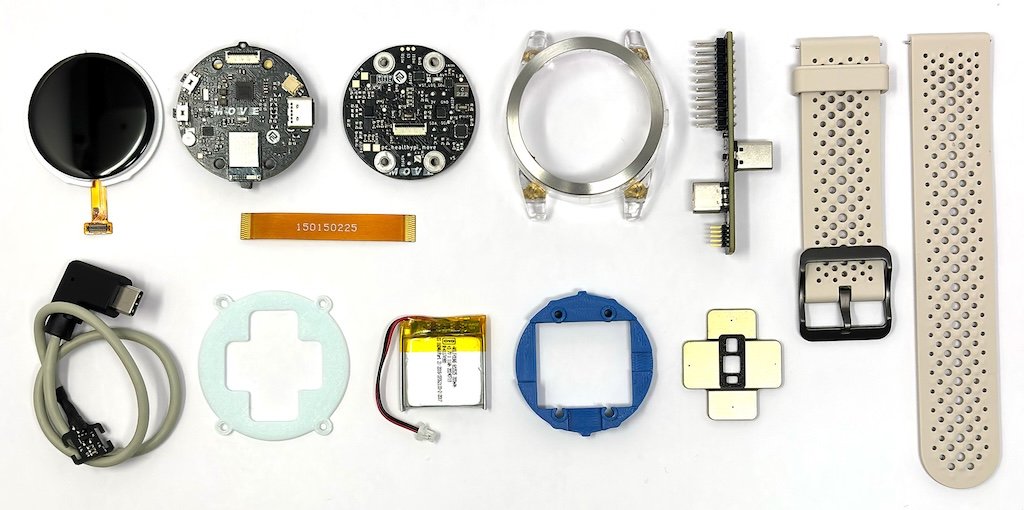
Summarising all these components, here is a teardown of the complete final assembly:
If you have read this far, thank you for your patience. We are very excited to have the final enclosure design ready and glad to have finally agreed on something we hope everyone would like as well. We have received our initial batch of bodies and tested them extensively and we are happy to report they are all good. When we started out with this project, we only focused on the electronics and the algorithms while we only had a vague idea of what the enclosure would look like. We never thought the enclosure would be such a big part of the project and would take so much time and effort to get right. We hope all this effort shows in the final product and we hope you like it.
Production Progress
While the enclosure is now ready, we have been working on other things such as packaging, user manuals, and the optimizing the firmware for the final hardware. More on the software and firmware in the next update.
As noted in our previous update, we are unfortunately still waiting on the Analog Devices MAXM86146 sensor which seems to have suddenly become very elusive, given that it was very much available and just introduced when we started the project. We are working with Analog Devices and Mouser to expedite the delivery of these sensors with some hope. In the worst case scenario, we also have a standby design based on a discrete set of MAX86141, MAX32664C, and discrete LEDs and photodiodes that we can use. These three parts replace the single MAXM86146 (the simplicity and cost difference of which also seems to be the reason for the sudden spike in demand for these chips). We are ready to go at a moment’s notice with Plan B once we exhaust all our options to get the MAXM86146. This would, of course increase our cost of production and also the complexity of the design, but we are ready to do this if we have to.
Considering all this, and also considering we have already completed assembly and testing of our full first batch of the main board and enclosures, we are still keeping our shipping date as mid-January of the coming year and we are hopeful that we can keep to this date. We will keep you updated on the progress and the delivery dates as we get more information. Thank you for your patience and support.


