We think it’s really important that all Giant Board users be able to customize their operating system. As a result, we spent a lot of time writing and testing a set of scripts that will allow anyone, regardless of their experience level, to configure, compile, and build Giant Board OS images. In this update we will introduce those Build Tools and walk through the process by which you can build a custom kernel and create a device image that boots to it.
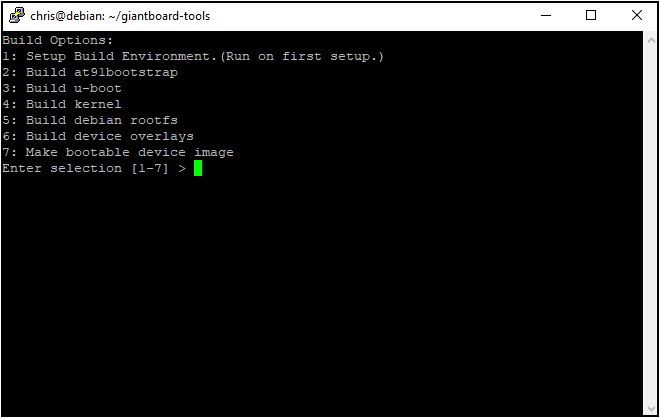
In the examples below, we will be running the Giant Board Build Tools on a 64-bit Debian based system. The included scripts handle all six of the tasks required to create a bootable Giant Board OS image that can be loaded directly onto a micro SD card:
- Building AT91Bootstrap, the initial bootloader
- Building U-Boot, the real bootloader
- Building the Linux kernel that will run on your Giant Board
- Setting up the root file system to make sure it includes everything your Giant Board will need
- Configuring the device tree overlays so your Giant Board knows how to talk to peripheral hardware
- Building a bootable image that includes all of the above
More generally, these scripts will download all of the packages you need, set up a folder structure within which everything can be built, execute the commands needed to compile each component, and bundle everything together into a Giant Board OS image.
If you want to get started, you can download the Giant Board Build Tools from our public GitHub repo. Inside this folder you will find one main script that knows how to dispatch all of the other scripts. Running ./build_menu.sh from the commandline – after a simple chmod +x build_menu.sh – will bring up a menu. You can use this menu to carry out all six of the tasks listed above (each of which is described in more detail below).
If this is your first time using Build Tools, however, you should run the Setup Build Environment option before you do anything else. It will download all of the packages and set up all of the folders you will need to build each element of the OS. Once you’ve done that, it’s just a matter of running down the list and completing each task.
AT91Bootstrap
You will rarely need to change anything here, so a basic build should be enough for most use cases. It only takes a few minutes to build at91bootstrap on a modern computer.
U-Boot
The next step is to build a more versatile bootloader called U-Boot. We have included a default Giant Board config file for U-Boot, which sets up the basic interfaces for loading the kernel, as well as a few patches that customize the boot configuration to provide support for device tree overlays. You can make changes here if you need to include more drivers before loading the kernel, but the default configuration should be sufficient for basic use. U-Boot should only take a few minutes to build, after which you can move on to the next script.
Linux Kernel
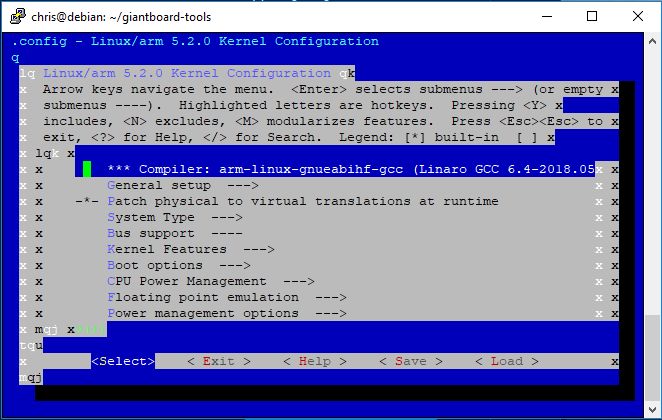
The kernel is where most of you will probably be customizing your Giant Board images, and Build Tools makes it easy to include the drivers and other features you might want in a custom kernel. When you execute this script, it will download the kernel, run through an initial setup process, and present you with a configuration menu. You can then go through that menu and enable whichever drivers and features you want to build into your kernel. When you are done, you can exit the menu, which will write your preferences to a config and begin building the kernel. This should take about 10 to 25 minutes, depending on how many features you have enabled.
Root File System
Once the kernel build is finished, you will need to build the root file system. By default this script downloads and installs everything you need to use Adafruit’s Blinka library (CircuitPython for Linux), as well as a few tools for network management. This is another script that you can easily edit if you want to include certain other programs by default. If you want to run the device completely offline, for example, this would be a good way to download and install any packages your Giant Board might need. This script can take a while, depending on what you include.
Device Tree Overlays
Next in line is a script for building the device tree overlays that are included in a default Giant Board image. These overlays make it easy to enable devices – such as Wifi and Etherent adapters, among other peripherals – at boot. You can also use this script to compile custom device tree overlays. This step should only take a few seconds.
Building the Image
The final step involves putting everything together into a bootable device image. Build Tools will take care of setting up partitions, formatting them, and combining the output of steps one through five into a single image. It should only take a minute or so for this process to complete. When it’s done, you can use whatever tool you prefer to write that image to a micro SD card.
Conclusion
Being able to create your own device images means you can add to, remove from, and customize those images to suit your own particular needs, which is great. We have done our best to simplify the process so that everyone can take advantage of that flexibility. Our Build Tools are a good learning resource, as well, because they allow you to see how everything fits together. Eventually, you can put together a different root file system, build different drivers into your kernel, or customize the build scripts themselves.
It’s been another great week for the campaign. We are over 70% funded, and we want to thank everyone for their support! Without your help, this project would not be possible, so thank you again to all of our backers and supporters. We are looking forward to the future of Giant Board!


