Project update 2 of 7
SenseTemp IoT Demonstration & DIY RTD Harness Information
MQTT & Adafruit.io
MQTT is a lightweight publish/subscribe based messaging protocol which runs on top of TCP connections. It was created in 1999 and since then has seen wide adoption, especially in low-power device-to-device communication.
Before moving on to the demo & code, there are a few terms which are useful to know in interacting with MQTT.
- Client: a device which publishes or subscribes to topics. Clients can subscribe to as many topics as they'd like (or zero if they only publish) and don't need to have knowledge of any other client.
- Broker: the central process which receives topic-based messages and distributes them to subscribed clients
- Topic: the 'name' or path that messages are published to. Note that Adafriot.io uses the word 'feed' instead of 'topic'.
- Message: the actual data which is sent by a client to a broker, and which is associated with a topic. Messages can have any encoding/formatting. It's common to publish raw numeric values and also JSON-formatted dictionaries of information.
Adafruit.io is a hosted MQTT broker. It also exposes all published data through a well-designed HTTP API and provides web-based graphical dashboards which display data sent to it. There is a free tier for the service and also a paid tier, which has higher message rates, longer data retention, and lifts other usage limits.
SenseTemp with an ESP32 host can connect to any MQTT broker and publish data to it. It’s easy to run your own, like Mosquitto, but here we’ll be using Adafruit.io as it has great built-in & live-updating graphs.
Full MicroPython source code for this demo is in the SenseTemp GitHub repository, a few excerpts will be shown here.
First, create the necessary objects which all communication with the MAX31865 ICs.
RTD_NOMINAL   = 1000.0  ## Resistance of RTD at 0C
RTD_REFERENCE = 4300.0  ## Value of reference resistor on PCB

## Create Software SPI controller.
## MAX31865 requires polarity of 0 and phase of 1.
## Currently, the micropython on the ESP32 does not support hardware SPI
sck  = machine.Pin( 5, machine.Pin.OUT)
mosi = machine.Pin(18, machine.Pin.IN)
miso = machine.Pin(19, machine.Pin.OUT)
spi  = machine.SPI(baudrate=50000, sck=sck, mosi=mosi, miso=miso, polarity=0, phase=1)

## Create SPI Chip Select pins
cs1  = machine.Pin(33, machine.Pin.OUT, value=1)
cs2  = machine.Pin(15, machine.Pin.OUT, value=1)
cs3  = machine.Pin(32, machine.Pin.OUT, value=1)
cs4  = machine.Pin(14, machine.Pin.OUT, value=1)
css  = [cs1, cs2, cs3, cs4]
Next, configure the ESP32’s WIFI networking & connect to the Adafruit.io MQTT broker
nic = network.WLAN(network.STA_IF)
nic.active(True)
check_wifi(nic)

c = mqtt.MQTTClient(
    client_id = settings['device']['name'],
    server    = settings['mqtt']['server'],
    user      = settings['mqtt']['user'],
    password  = settings['mqtt']['key'],
    ssl=False
)

c.connect()
Lastly, publish temperature data to a topic of your choice. This uses Adafruit.io’s group feature, which allows publishing of multiple topics in a single message to the service.
while True:
    # Multiple topics can be published in one message if this CSV form is used:
    #   SENSORNAME1,VALUE1
    #   SENSORNAME1,VALUE2
    #
    # `poll_sensors` returns [[name1,value1],[name2,value2],...] formatted data
    # `format_data` transforms that data into this CSV string form
    #
    # Measurements will appear as
    #   USERNAME/feeds/FEEDNAME.SENSORNAME1
    #   USERNAME/feeds/FEEDNAME.SENSORNAME2
    #   USERNAME/feeds/FEEDNAME.SENSORNAME3
    #   USERNAME/feeds/FEEDNAME.SENSORNAME4

    c.publish(mqtt_feedname, format_data(poll_sensors()))
    time.sleep(3)
In the web-based interface, you can easily configure graphical dashboards which chart data over whatever time interval you’d like.
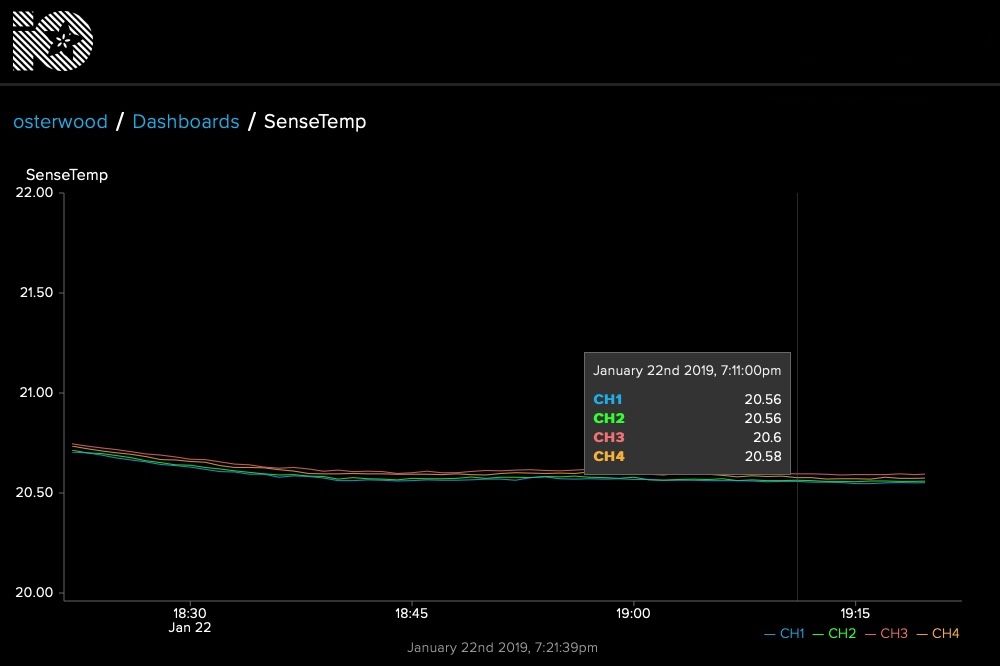
Here is 4 hours of data from SenseTemp’s 4 RTD sensors placed on an aluminum block. Note that the vertical range on this graph is only 2°C — there is less than 0.1°C difference between RTD readings at any moment in time.
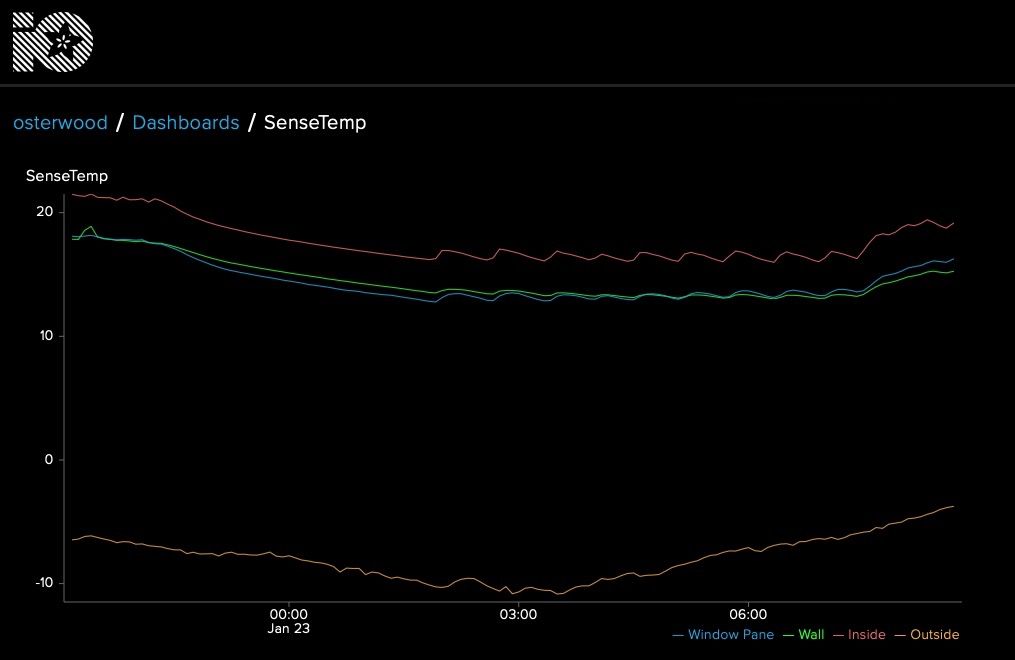
A SenseTemp at my office is right now streaming temperature data to a public dashboard on Adafruit.io. Currently, SenseTemp is monitoring:
- Indoor air temperature
- Outdoor air temperature
- Surface temperature of a double pane window
- Surface temperature of the wall next to that window
Here, a graph of about 12 hours of data. You can clearly see when the inside heat was turned down overnight, and a sawtooth pattern caused by the heating system cycling on and off, keeping the inside temperature above 15°C (60°F).
DIY RTD Harness Information
I’ve gotten a few questions about if it’s possible to make your own RTD harness for SenseTemp. The answer is YES, if you’re okay with small component soldering. SenseTemp is designed to use Resistance Temperature Detector (RTDs) with a resistance of 1000 ohms at 0°C, also known at P1000 RTDs.
Any P1000 RTD can be used with SenseTemp, but the RTD Harnesses we’re fabricating use L 420 Series, 32207582 from Heraeus Sensor Technology. These RTDs have an accuracy of ±0.15°C from -50°C to 300°C, and leads are coated with a Silver Palladium alloy (AgPd). This allows these RTDs to be more easily soldered than most RTDs, which are normally coated in a Platinum alloy, which need to be welded to the sensing cable. This document from Heraeus goes into nice detail about RTD selection, coatings, and performance.
If you’d like to make your own harnesses, this is a recommended Bill of Materials for you:
| ID | Part | MFG | SKU | QTY | Price |
|---|---|---|---|---|---|
| A | IDC Connector | CNC Tech | 3230-16-0103-00 | 1 | $1.43 |
| B | 0.025" 16C Ribbon Cable | 3M | 3754/20 300 | 5 FT | $4.84 |
| C | Heat shrink labels | ||||
| D | 1.2mm diameter heat shrink | ||||
| E | P1000 RTD | Heraeus | 32207582 | 4 | $5.98 EA |
It comes to around $30 in parts, and you’ll also need some small diameter heat shrink, and ideally means to label which RTD is which channel. Note the ribbon cable specified here is 20 conductors, so will need to be split into 4 bundles of 4 conductors prior to soldering RTDs on the ends and crimping into the IDC connector.
The RTD Harnesses provided with SenseTemp and SenseTemp TEC use silicone ribbon cable from Cicoil. This silicone ribbon cable is:
- More durable and much more flexible than PVC cable.
- Rated to an operating temperature of 260°C instead of PVC's 105°C.
But is significantly more expensive and not stocked at electrical distributors, which is why the SenseTemp RTD Harness costs between $75 and $125.
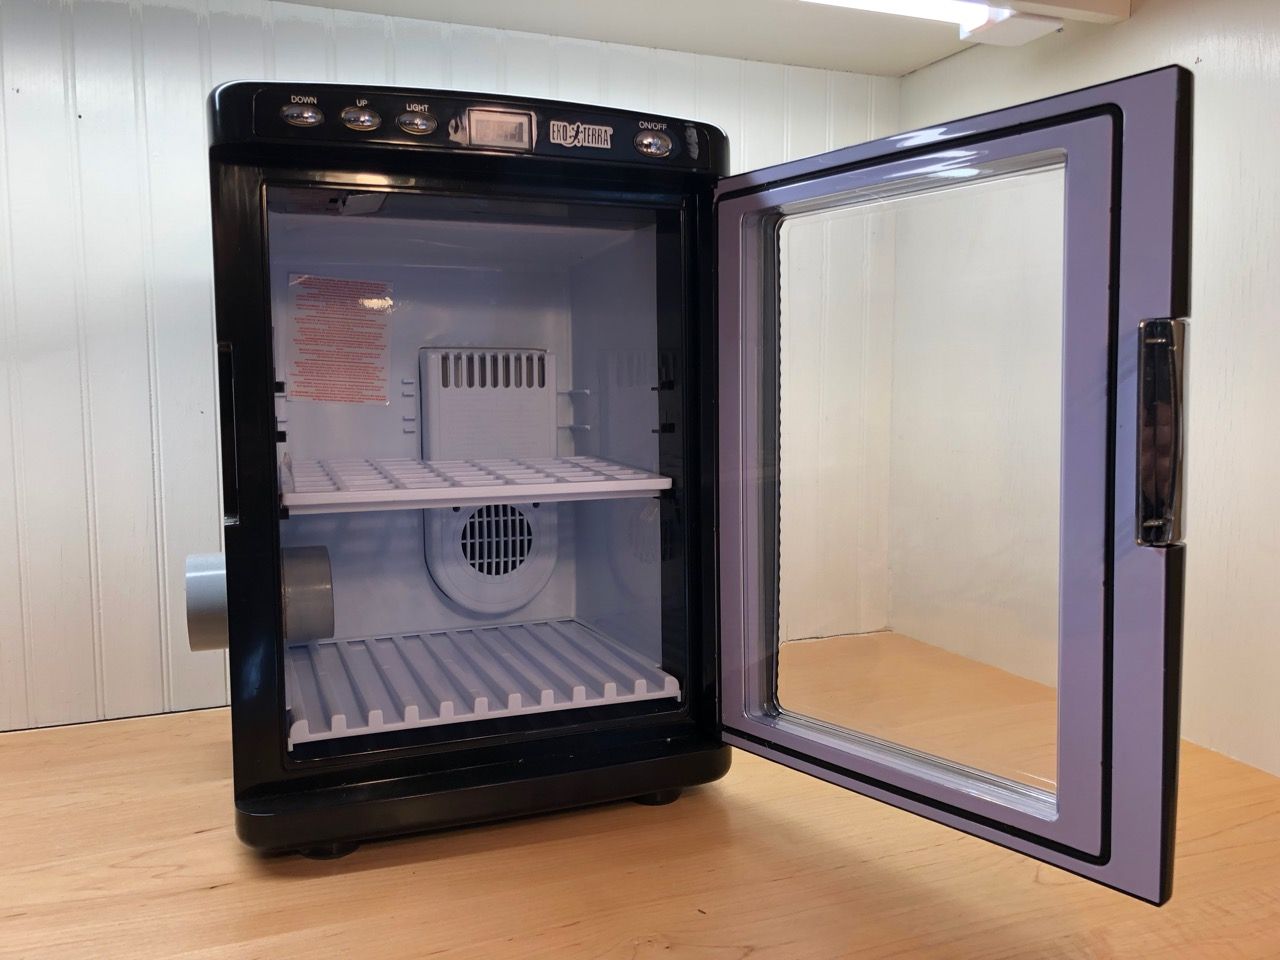
Preview of a SenseTemp TEC enabled thermal chamber
Next week’s update will include instructions on how to turn a reptile incubator into a remotely controlled thermal test chamber using SenseTemp TEC.


